Showing posts with label Blog Party. Show all posts

Saturday, October 25, 2014

Halloween Party 2014 - Crafts, Jack O' Lanterns, and a few thoughts ...


When it comes to Halloween there's so much I could write about.  I'd love to talk about the origins of Halloween and how hypocritical it is that so many condemn it as something evil due to its pagan origins.  I remember one girl at my high school telling me that if I really knew how Halloween began I wouldn't celebrate it.  Well, as far as I know, Halloween was thought to be the easiest day for fairies and the souls of the dead to cross over into the mortal world.  And while it may seem a bit scary to think that trick-or-treating came from the practice of bribing the otherworldly beings with food so they would not harm the living, I think it's worth noting that departed loved ones were thought to revisit their homes.  A quick Wikipedia search reveals that people would set a place at their dinner tables to welcome family members who had died.  Keeping in mind that these are the customs of a people from a very different time, place, culture, and lifestyle, I would think October 31st was a day that reminded people to show their ancestors the respect they deserve, but also a day that comforted the grieving, making them feel as if their loved ones were not far away, and ultimately reminding them to appreciate their loved ones who were still living.

I could go on and dissect individual statements people have made denouncing Halloween, or examine the very false claim made by my cabdriver just yesterday that Halloween is only celebrated in North America.  I could launch into a critique of Halloween-related movies, or comment on why my city's newspaper always runs an article around this time of year about the Halloween "slut rule" discussed in the 2004 film Mean Girls - but I won't.  As I've said previously, Halloween for me is about creativity, so this very late post will be about my projects from last Halloween:

The following are some Halloween Rose Magnets I made using 2-sided scrapbooking paper, orange and black ribbon, refrigerator magnets, and hot glue. 


To make the roses I followed instructions found on Pinterest.  I hot glued them in place, glued 2 strips of ribbon onto each magnet, and then hot-glued each rose onto a magnet.  I only managed to make 6 roses, and some of them I gave out with candy to trick-or-treaters.  


I also made an assortment of Halloween Bookmarks to give out with candy to trick-or-treaters.
 
 
Again, I used Halloween scrapbooking paper as well as some patterned orange scrapbooking paper and black cardstock.  I used assorted ribbon, craft border scissors, a glue stick, and a pumpkin stamp.


The last of my projects for the year was my Harvest Witch Jack O' Lantern, whose witch hat I constructed out of potpourri and hot glue. 


I also used some potpourri pieces for the eyes and tongue.  The following are some pictures of the pumpkin in various stages.
 
As you can probably see, I hammered tiny nails into the pumpkin and then glued some potpourri pieces onto the nails.
It wasn't the safest or most secure method of attaching parts to the pumpkin, but I've discovered in the past that hot-gluing directly onto the pumpkin does not work well.


When undertaking any project it always helps to have moral support and mine came from my constant helper - although I suspect this photo captures her attempt to take credit for my work.


It's kind of hard to stay made at her though ...


Happy Halloween!
 

Thursday, October 23, 2014

Halloween Party October 25, 2014 - Hosted By A Fanciful Twist

Hi everyone ... it's certainly been a while!  Now that I finally have a new and functioning computer of my own I am hoping to blog more often.  In fact it's a goal of mine - I find it so disappointing when I come across what looks like an interesting blog only to discover its most recent addition was more than a year ago.  I still have projects to show, experiences to tell, movies and TV shows to analyze, thoughts and opinions to discuss, political and world-views to push on people (just kidding) and socks to enjoy so I would to keep my blog from looking abandoned to potential readers.

Having said that, I am hoping to join in the upcoming Halloween Blog Party on Saturday, October 25, 2014 hosted by A Fanciful Twist as I love Halloween!  As far as I'm concerned Halloween is the most creative holiday that I know of.  Not only can you bake festive desserts and decorate your home inside and out as you would for Christmas, but you can carve Jack O' Lanterns, make masks, sew costumes, experiment with strange hairstyles, and try new makeup and cosmetics like false eye-lashes and fake tattoos.

While I'm rather late joining in, I really hope I can be a part of it, and I can't wait to see what other participants will post.  See you then!

Sunday, October 23, 2011

Halloween 2011 Blog Party Hosted By Frosted Petunias

I'm just writing a quick post to say that I am planning on participating in Frosted Petunias' Halloween blog party, entitled "A Witches Tea Party Under The Halloween Moon" which takes place on October 29th and 30th.
 You can reach the party's website by clicking on the icon to the right of my page, or by clicking on the following link:

http://halloweenmoontea.blogspot.com/

Thursday, October 28, 2010

Halloween 2010 Blog Party Post Part 3: Halloween Colours In Costumes and Decor

For Part 3 of my Halloween 2010 Blog Party posts, I would like to discuss something important in when choosing Halloween decorations, creating Halloween crafts, and picking out the absolute best Halloween costumes:

C o l o u r !

Most people only associate 2 colours with Halloween - Black, and Orange. While these colours are important, I would like to take some time to discuss other great Halloween colours, what makes them great Halloween colours, and great reasons to use them ...

Orange and Black are commonly thought to be Halloween colours, as Orange is associated with pumpkins and bonfires, and Black is associated with the night sky, black cats, bats, etc ... But there are many other great Halloween colours that go unused in decorating such as certain shades of Green - particularly Lime Green.

Green is a great Halloween colour because it compliments Orange, and next to Black it recalls The Wicked Witch of The West from The Wizard of Oz.


It can also be associated with a witch’s brew, magical potions, the liquids in beakers and test tubes of a mad scientist, and even with certain monsters such as some depictions of Frankenstein’s monster!


Purple can be a great Halloween colour for the simple reason that it compliments Green so well. Batman’s The Joker shows us this, as his Purple suit is complimented by his Green hair! Combined with Black, Purple can also be a very sexy colour indeed, and can be used in very striking costumes for women.


Furthermore, since colours associated with Christmas are frequently Red, White, and certain shades of Green and Yellow, perhaps a lot of the remaining colours can be associated with Halloween, and Purple is one of them!

My theory is that Orange, Green, and Purple all work so well as Halloween colours because they are all Secondary Colours – colours made by mixing 2 primary colours. While we can associate certain shades of Green with Christmas due to its association with evergreen boughs, I think the Primary Colours are all representative of Christmas:

- Red for certain berries and the colour of Santa Claus’s costume
- Yellow for stars, candle light, and of course the glittery dust associated with magic
- Blue for the chilly weather, ice, and snow at this time of year,

With this in mind, I think we can use all of the remaining or Secondary Colours for Halloween when decorating.

I should note, of course, that Red is still an exception to the rule. Just as the Secondary Colour Green can be associated with Christmas and Halloween, Red too can be associated with both Christmas and Halloween, as it is the colour of blood, and can be reminiscent of many vampires and their capes! Of course, we mustn’t forget that it is often the colour of seductive lips!


Moving on, never forget about Black and White! Not Black. Not White. Black and White - particularly stripes! Black and White are often used to represent opposition, opposing forces, and light verses dark, so what better colours can be joined on a night where the frightening is celebrated and the dark side is confronted? Together they acknowledge the presence of both light and dark or good and evil influences and may even imply a struggle between good and evil!


Black and White stripes remind us again of the 1939 film The Wizard of Oz, but this time of the Wicked Witch of The East, last seen wearing a dramatic pair of Black and White striped stockings.


Black and White stripes are also reminiscent of Tim Burton movies, as they are one of his trademarks that appear in almost all his films. Just look at his 1988 title-character Beetle Juice!


Not only can Black and White appear together in stripes, but in spirals they call to mind images of hypnosis – often a very spooky concept! If one looks closely at such a spiral, one can almost imagine peering into a deep, dark well ... or rabbit hole!


In some instances, Black and White may be used to recall Black and White movies, and therefore previous times in history.

Finally, my favourite association with Black and White together around Halloween is that of a wedding. A wedding, you may ask? What does this have to do with Halloween?

Imagine for a moment, the following characters from some very frightening stories:

. Count Dracula and Lucy Westenra of Bram Stoker’s Dracula


. Eric and Christine of Andrew Lloyd Webber’s The Phantom of the Opera


. Hamlet and Ophelia of Shakespeare’s Hamlet


What do all of these pairs of characters have in common? Each male character in these “couples” is depicted in a Black suit while each female character is depicted wearing a long White dress. Isn’t it interesting how these clothes are identical to the traditional concepts of a bride and groom?

It makes sense that the characters in these stories wear these colours, as these stories could be considered Gothic Literature. They seem to fit all of the characteristics of Gothic Literature, one of which is women in distress, another of which is women threatened by a powerful, impulsive, tyrannical male! The women in the above lists are indeed in distress, and the men in the above list can be thought to be the threatening men! Perhaps portraying them in traditional wedding costumes is ironic, and yet perhaps it is meant to reflect the fear many have of marriage and intimacy ...

For more information on Gothic Literature, visit Elements of the Gothic Novel: http://www.virtualsalt.com/gothic.htm

Well, I hope you've enjoyed my review of the depths of Halloween Colours, and I hope that this helps when choosing decorations, making or choosing Halloween costumes, and creating Halloween crafts. I look forward to any comments and additional opinions on what makes some colours Halloween colours!

Halloween 2010 Blog Party Part 2: Halloween Crafts!

For Part 2 of my Halloween 2010 Blog Party posts, I would like to show some simple crafts with a brief summary of how I created them.

A Rocking Witch!


For this doll, I used a plain cloth doll that I had already purchased. For everything else, I used scraps!

. To create the stockings, I used an old pair of socks that I was no longer wearing. I cut them so that they could fit around the doll’s legs, glued one end of the sliced sock to the doll leg with a glue gun, wrapped the rest of the fabric around the leg to meet the other glued-down end, and then glued again on top. This is probably my favourite part of the doll! I think the stockings make her look very stylish and funky!

. For the black dress I used small pieces of left over black fabric. I positioned some around the doll and experimented until it resembled a dress. Oddly, the scrappiness and lack of sewing or cutting actually creates the appearance a realistic dress!

. To make the hair, I used black and gold yarn. I cut several strands all the same length allowing them to be long enough to hang down the back of the doll, while also allowing them to be long enough to come down slightly over the face to appear as bangs. I adjusted the yarn till I was satisfied with the appearance and glued down on the top of the head. I love the effect that the gold strands have against the black yarn of the hair!

. For the hat I again used scraps of black fabric, but I also used silver and green pipe-cleaners to line the rim and cone part of the hat. The pipe-cleaners hold the hat in the desired shape and also allow the hat to be adjusted in any shape desired.

. The scarf is simply a long rectangle of orange fabric that was leftover from another sewing project. A small clothespin holds the scarf and dress fabric in place at the back of the doll’s neck.

. Her smile is a simple, small line of black fabric paint. The other facial features are made of glued on fabric, with black fabric paint for the pupils.

. Other than that, I used pieces of metallic confetti to decorate the hat and dress. This, combined with the metallic gold of the yarn and the metallic pipe-cleaners on the hat allow for a shininess that one can only assume comes from magic! Or a rock star ... you decide ...


Frightful Bookmarks!

... For Frighteningly Good Books!


These bookmarks were very simple to make.

. They were created out of sheets of cardstock, which were previously purchased in a package of sheets of various colours. I then chose the colours of paper that could be best associated with Halloween. More on Halloween Colours in my next entry!


. I cut the paper long-ways into inch-thick strips that I then folded in half to create an appropriately sized, sturdy bookmark.

. I then chose Scrapbooking Embellishments that were purchased from Dollarama, and decided which looked best on the different colours of paper. After this, I just glued away!


. Last but not least, I cut small slits to make a small triangle near the top so that a ribbon could fit through and tied it in a knot. I chose ribbons that complimented the Scrapbooking Embellishments, mostly Black and White.

Sunday, October 24, 2010

Halloween 2010 Blog Party Part 1: Jack O' Lanterns from the Last 2 Halloweens

2008 and 2009 Sorceress Jack O' Lanterns


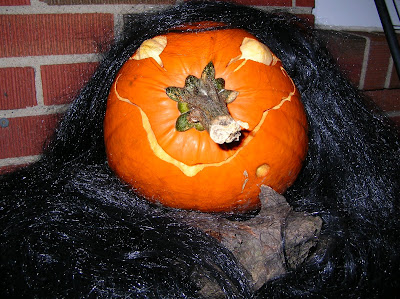
For this Jack O' Lantern from 2008, I turned the pumpkin on its side while carving and used the stem for the nose. This allows the pumpkin's natural lines or ribs to appear as wrinkles when a face is carved. I used a long, black Halloween wig for the hair. To display the Jack O' Lantern, however, I actually placed this one face-up as opposed to face-forwards. This meant lying the wig on the ground on the porch and placing the pumpkin on top of it. I thought this would work as the pumpkin used was small, and placed by the door the Trick-Or-Treaters would really get a better look at it this way.

The following pictures are of a similar Jack O' Lantern from 2009:


I used a bruise on the pumpkin to appear as a mole. I think the affect was great!


The eyes were tricky: I carved holes for the eyes and used the pieces that were removed for the pupils. I carved them into egg-like, oval shapes and removed the skin. I continued to slice away to make them rounder, and when satisfied, positioned them in the eye-holes and held them in place with toothpicks. I felt this was worth the trouble because it allowed the light to shine behind the pupils all the way around.


From this angle, you can see that the smile is not only very crooked, but the corners are also curled. This makes the smile very mysterious!


2008 Cannibal Jack O' Lantern


These are pictures of a larger pumpkin I used, which I thought would look great eating some smaller pumpkin victims!


I carved a large mouth and used the remaining pieces from the mouth for the larger pumpkins sinister hands. For the smaller pumpkins I carved three of their faces to have different frightened expressions. I tried using a black Sharpie permanent marker for the front pumpkin, and I like the bold affect this makes. In the future, I may consider only drawing the faces of the smaller pumpkins, as candles cannot be placed inside, and thus the black marker would stand out better.


Most of the smaller pumpkins are placed on the hands in front of the larger pumpkin to create the affect that the larger pumpkin is bringing them slowly towards his mouth in a frightening act of cannibalism, yet one of the tiny pumpkins is already being chewed!

2009 A Mad Scientist's Victim (or An Artistic Depiction of a Migraine)


To carve this pumpkin, I turned it on its side and carved the face on the bottom, using its blossom end or belly-button as the nose.


I carved the lid in what would normally be the side of the pumpkin, but when placing it back on top, I replaced it upside down so that it could act as a kind of bowl for its seeds and fibrous strands - when piled on top of the bowl-lid, the seeds and fibrous strands look like brains!


Though not visible from the photo, I chose to scatter some of the seeds and "brains" along the ground around the pumpkin. I added stitches around the head to give the impression that this individual has suffered a similar fate to another famous stitched up character often referred to as "Frankenstein."
Perhaps from personal experience as a migraine sufferer, I felt that drooping eyes with pupils rolled towards the top and a frown that exposes the teeth would be an effective way to portray pain. Perhaps other migraine sufferers can identify with this poor guy!


I hope this has been enjoyable, and if anyone would like any further instructions on how I created these particular Jack O' Lanterns please feel free to leave a comment. As always, I also welcome comments, suggestions, and constructive criticism.

If you have any Jack O' Lantern photos you would like to share with me, again, please leave a comment and a link, and I would love to check them out! Believe me, I am always looking for inspriration!


Though I am definitely no professional, I would be willing to offer suggestions for your pumpkins and tips on how to create a particular type of Jack O' Lantern.


This has been Part 1 of my Halloween Blog Party 2010 posts. I plan on posting more entries for the blog party, and will most likely end them with a final set of photos of my Jack O' Lanterns from this year's Halloween. I do not yet know what I will be carving, but I welcome any suggestions or links to inspirational Jack O' Lantern pictures.


For now, happy carving everyone!